Wednesday, December 10, 2008
Oracle 11gR2 Installation on RHEL 4
Wednesday, December 10, 2008
Dataguard Adventures - Part I...!!!!!
Wednesday, December 10, 2008
Dataguard Adventures - Part II...!!!!!…

Wednesday, December 10, 2008
When ASM rebalancing stops...!!!!
Monday, December 8, 2008
Reducing Downtime during database movement and migrations
Database Cloud Service or (Database as a Service) on OPC (Oracle Public Cloud)
I recently starting working on Oracle Public Cloud, so my next posts will be focussed on different services available on OPC and use cases for them.
Oracle is offering PAAS and IAAS services.Here's a quick link to services that oracle has to offer along with their pricing.
Being a database guy, my interest will be to test the database services. Oracle offers these 2 services on database front
1) DBCS - Database Cloud Service or Database as a Service
DBCS provides an option to create standalone as well as RAC database on cloud. As part of provisioning this service, software is installed for you and database is created. As of now, a service can be created with 11.2.0.4 and 12.1.0.2 database versions. With DBCS, oracle provides cloud tooling - tools to take backup/recovery and patching databases.Backups are automatically scheduled when the service is created and PSU patches can be applied with the click of a button from DBCS console.
The interesting part of DBCS is RAC which is not available on any other public cloud. As of now, you can build a 2 node rac cluster with 12c clusterware and 11g/12c database. With multi tenancy available from 12c, container database is the option available for creating 12c databases,
Another interesting point about DBCS is databases are encrypted by default. Being on cloud, customers are always concerned about the security of their data. So customer database is encryoted by default on cloud. DBCS uses TDE for data encryption at rest and TDE works the same way it is implemented for on-prem databases. Network encryption and integrity (12c feature) is enforced for in-flight data.
Scaling is another good feature in DBCS. For increased load, you can actually scale up a machine to to a different shape of higher memory/cpu. This of course can be done with the click of a button.
2) Virtual Image
Virtual image is a service where VM is created and software is staged for you on the VM. You can add additional block storage using cloud console and install the software and create database. Cloud tooling is not available as part of this service which means customer has to schedule backups and patch databases manually like they do for on-prem databases.
A good thing about both services is that you will get complete shell access (root as well as oracle OS user) and do your stuff.
These services are available on 4 database editions
1) Standard Edition
2) Enterprise Edition
3) High Perfromance
4) Extreme Performance
High and Extreme Performance are not the new editions but just just differentiation on the basis of options they provide. Here's quick link on the features available in these database service editions.
Dataguard is available in Enterprise, High and Extreme performance editions while RAC is available only in Extreme Performance Edition.
For creating the database deployments, there are 2 compute options
1) General Purpose Compute
General purpose compute provides these 5 options. OCPU is Oracle Compute Unit.
OC3 - 1 OCPU, 7.5 GB RAM
OC4 - 2 OCPU, 15 GB RAM
OC5 - 4 OCPU, 30 GB RAM
OC6 - 8 OCPU, 60 GB RAM
OC7 - 16 OCPU, 120 GB RAM
2) High Memory Compute
High memory compute is suitable for high memory requirements
OC3 - 1 OCPU, 7.5 GB RAM
OC4 - 2 OCPU, 15 GB RAM
OC5 - 4 OCPU, 30 GB RAM
OC6 - 8 OCPU, 60 GB RAM
OC7 - 16 OCPU, 120 GB RAM
ExaCS-Exadata Cloud Service
Apart from DBCS and RAC, Exadata is also available on cloud. This is really a superb and affordable option for customers who still don't have on-prem Exadata and want to play with it or customers who want do quick POCs for their applications. ExaCS is available as Quarter, Half and Full Rack with additional OCPU options. This means you can get available racks and scale up the service with additional OCPUs.
I'll explore a lot of these interesting features in coming days and blog them. So stay tuned...!!!
Change DB NAME for RAC Database
Changing DB_NAME for a RAC database is no different from a single instance database. The RAC database is opened as single instance (with CLUSTER_DATABASE =FALSE), then the DB_NAME is changed just like we do in case of a single instance database and then put this single instance database back into RAC.I recently did this for one of my 11gR2 (11.2.0.1) database, so thought of documenting it.
[/tmpbackup/CM441758/scr]$ crsctl stat res -t
--------------------------------------------------------------------------------
NAME TARGET STATE SERVER STATE_DETAILS
--------------------------------------------------------------------------------
Local Resources
--------------------------------------------------------------------------------
ora.CIDCQ1_DISK_GROUP_01.dg
ONLINE ONLINE gvx0acidb01q
ONLINE ONLINE gvx0acidb02q
ora.CIDCQ1_DISK_GROUP_02.dg
ONLINE ONLINE gvx0acidb01q
ONLINE ONLINE gvx0acidb02q
ora.LISTENER.lsnr
ONLINE ONLINE gvx0acidb01q
ONLINE ONLINE gvx0acidb02q
ora.asm
ONLINE ONLINE gvx0acidb01q Started
ONLINE ONLINE gvx0acidb02q Started
ora.eons
ONLINE ONLINE gvx0acidb01q
ONLINE ONLINE gvx0acidb02q
ora.gsd
ONLINE ONLINE gvx0acidb01q
ONLINE ONLINE gvx0acidb02q
ora.net1.network
ONLINE ONLINE gvx0acidb01q
ONLINE ONLINE gvx0acidb02q
ora.ons
ONLINE ONLINE gvx0acidb01q
ONLINE ONLINE gvx0acidb02q
--------------------------------------------------------------------------------
Cluster Resources
--------------------------------------------------------------------------------
ora.LISTENER_SCAN1.lsnr
1 ONLINE ONLINE gvx0acidb02q
ora.cidcq1.cidcq1_s1.svc
1 ONLINE ONLINE gvx0acidb01q
ora.cidcq1.cidcq1_s2.svc
1 ONLINE ONLINE gvx0acidb02q
ora.cidcq1.db
1 ONLINE ONLINE gvx0acidb01q Open
2 ONLINE ONLINE gvx0acidb02q Open
ora.cidcq1.infaadhoc.svc
1 ONLINE ONLINE gvx0acidb02q
2 ONLINE ONLINE gvx0acidb01q
ora.gvx0acidb01q.vip
1 ONLINE ONLINE gvx0acidb01q
ora.gvx0acidb02q.vip
1 ONLINE ONLINE gvx0acidb02q
ora.oc4j
1 ONLINE ONLINE gvx0acidb02q
ora.scan1.vip
1 ONLINE ONLINE gvx0acidb02q
oracle @ gvx0acidb01q:cidcq11
[/tmpbackup/CM441758/scr]$
I need to change the database name form cidcq1 to cidcq2. The cidcq1 database is running on a two node 11gR2 cluster.Below is the sequence of steps to be following to achieve this.
1) Create a backup pfile and controlfile
[/home/oracle]$ export ORACLE_SID=cidcq11
[/home/oracle]$ sqlplus / as sysdba
SQL*Plus: Release 11.2.0.1.0 Production on Sat Feb 5 12:35:28 2011
Copyright (c) 1982, 2009, Oracle. All rights reserved.
Connected to:
Oracle Database 11g Enterprise Edition Release 11.2.0.1.0 - 64bit Production
With the Partitioning, Real Application Clusters, Automatic Storage Management, OLAP,
Data Mining and Real Application Testing options
SQL> create pfile=’/tmp/initcidcq2.ora’ from spfile;
Change the following parameters in initcidcq2.ora.
*.cluster_database=FALSE
*.db_name='cidcq2'
*.control_files='+CIDCQ1_DISK_GROUP_01'
The OMF controlfile name is to be changed with the diskgroup.The reason this is required to be changed is because when you will create pfile from spfile, the control file will be written as OMF (like control_files=’+CIDCQ1_DISK_GROUP_01/CIDCQ1/CONTROLFILE/control.345.7654563') and when we are going to create controlfile later for changing db name, it will generate the new controlfile as OMF. This is not required if controlfile is not created as OMF in your database.
Accordingly changes other parameters (replace cidcq1 to cidcq2 whereever required)
Now, extract controlfile script using,
SQL> alter database backup controlfile to trace;
From Controlfile trace, extract the controlfile creation script and make the following change
REUSE to SET and datbase name from CIDCQ1 to CIDCQ2
CREATE CONTROLFILE REUSE DATABASE "CIDCQ1" RESETLOGS ARCHIVELOG
to
CREATE CONTROLFILE REUSE SET DATABASE "CIDCQ2" RESETLOGS ARCHIVELOG
Save the controlfile script as ctl.sql.
2) Shutdown the database from cluster
$ srvctl stop database –d cidcq1
3) Startup the database using changed initcidcq2.ora and re-create controlfile.
SQL> start nomount pfile=’/tmp/initcidcq2.ora’
SQL> @ctl.sql
This will create the controlfile and database name is changed.
SQL> alter database open resetlogs;
4) Add 2nd thread of online redologs.
SQL>alter database add logfile group 3 ‘+DISK_GROUP02’ thread 2;
SQL>alter database add logfile group 4 ‘+DISK_GROUP02’ thread 2;
SQL>alter database enable public thread 2;
5) Shutdown the database create spfile from pfile;
Shutdown the database and modify control_files parameters in /tmp/initcidcq2.ora to the actual controlfile name created.
*.control_files='+CIDCQ1_DISK_GROUP_01'
to
*.control_files='+CIDCQ1_DISK_GROUP_01/CIDCQ2/CONTROLFILE/control.400.7849384''
Change parameter cluster_database to TRUE.
SQL> startup nomount
SQL> create spfile=’+DISK_GROUP02/cidcq2/parameterfile/spfilecidcq2.ora’
6) Add database cidcq2 to cluster
$ srvctl add database –d cidcq2 –o /u01/app/oracle/product/11.2.0/db_home1 –p +DISK_GROUP02/cidcq2/parameterfile/spfilecidcq2.ora
$ srvctl add instance –i cidcq21 –n gvx0acidb01q
$ srvctl add instance –i cidcq22 –n gvx0acidb02q
7) Bring up the database in cluster
$ srvctl start database –d cidcq2
The database is now up as cidcq2. later the entries for cidcq1 can be removed and database can be registered in RMAN catalog for backup scripts to work.
Cheers…!!!
Rishi
Relocating datafiles in an ASM diskgroup
To relocate files, we need to take the datafile offline, then copy/move the file to the target diskgroup using
1) RMAN
2) DBMS_FILE_TRANSFER package
I prefer to user RMAN although i tested DBMS_FILE_TRANFER and it worked equally well. Finally after movement of datafile to the target diskgroup, we need to recover the offlined datafile and make it online.
Now what to do with the original(old) datafile…… No worries ASM takes care of that.
If the file to be relocated is an OMF on ASM, ASM will remove the original source file when ALTER DATABASE RENAME FILE.... is fired on the database.
On the other hand, if the file to be relocated is not an OMF, we need to manually remove the file after relocation. Hence the space after relocation would be automatically released back to source diskgroup in case of OMF file while this will not happen in case of non-OMF file.
Here are 2 scenarios to test this.One with source file as OMF and other with source file as non-OMF.
Scenario -I (File to be relocated is OMF on ASM)
The datafile 7 is being moved from ASM diskgroup +DISK_GROUP11 to +DISK_GROUP03
SQL> alter database datafile 7 offline;
Database altered.
RMAN> copy datafile 7 to '+DISK_GROUP03';
Starting backup at 07-FEB-11
using channel ORA_DISK_1
channel ORA_DISK_1: starting datafile copy
input datafile fno=00007 name=+DISK_GROUP11/pimq1/datafile/xml_data01.1214.694000501
output filename=+DISK_GROUP03/pimq1/datafile/xml_data01.329.742521331 tag=TAG20110207T235531 recid=23 stamp=742521337
channel ORA_DISK_1: datafile copy complete, elapsed time: 00:00:07
Finished backup at 07-FEB-11
SQL> alter database rename file '+DISK_GROUP11/pimq1/datafile/xml_data01.1214.694000501' to '+DISK_GROUP03/pimq1/datafile/xml_data01.329.742521331';
Database altered.
The above statement automatically removed the original datafile '+DISK_GROUP11/pimq1/datafile/xml_data01.1214.694000501'
SQL> recover datafile 7;
Media recovery complete.
SQL> alter database datafile 7 online;
Database altered.
ASMCMD> pwd
+DISK_GROUP03/PIMQ1/DATAFILE
DATAFILE UNPROT COARSE FEB 07 23:00:00 Y TOOLS.327.742520915
DATAFILE UNPROT COARSE FEB 07 23:00:00 Y USERS.328.742521119
DATAFILE UNPROT COARSE FEB 07 23:00:00 Y XML_DATA01.329.742521331
Scenario -II (File to be relocated is not an OMF on ASM)
SQL> select file#,name,status from v$datafile where file#=234;
FILE# NAME STATUS
---------- ---------------------------------------------------------------------- -------
234 +DISK_GROUP03/orenq1/datafile/rms_data_medium11.dbf ONLINE
ASMCMD> pwd
+DISK_GROUP11/ORENQ1/DATAFILE
ASMCMD> ls –lt ----- Output truncated
+DISK_GROUP11/orenq1/datafile/rms_data_medium11.dbf => +DISK_GROUP11/ORENQ1/DATAFILE/RMS_DATA_MEDIUM.1040.721644609
SQL> alter database datafile 234 offline;
Database altered.
RMAN> copy datafile 234 to '+DISK_GROUP03';
Starting backup at 08-FEB-11
using target database control file instead of recovery catalog
allocated channel: ORA_DISK_1
channel ORA_DISK_1: sid=420 instance=orenq11 devtype=DISK
channel ORA_DISK_1: starting datafile copy
input datafile fno=00234 name=+DISK_GROUP11/orenq1/datafile/rms_data_medium11.dbf
output filename=+DISK_GROUP03/orenq1/datafile/rms_data_medium.332.742522617 tag=TAG20110208T001656 recid=1 stamp=742523058
channel ORA_DISK_1: datafile copy complete, elapsed time: 00:07:26
Finished backup at 08-FEB-11
An important thing to be taken care while moving a non-OMF file is that if it is required to preserve the non-OMF name in the target diskgroup too,
then specify the complete path with filename during RMAN copy i.e.
RMAN> copy datafile 234 to '+DISK_GROUP03/orenq1/datafile/rms_data_medium11.dbf';
SQL> alter database rename file '+DISK_GROUP11/orenq1/datafile/rms_data_medium11.dbf' to '+DISK_GROUP03/orenq1/datafile/rms_data_medium.332.742522617';
Database altered.
SQL> SQL> recover datafile 234;
Media recovery complete.
SQL> alter database datafile 234 online;
Database altered.
SQL> select file#,name,status from v$datafile where file#=234;
FILE# NAME STATUS
---------- ---------------------------------------------------------------------- -------
234 +DISK_GROUP03/orenq1/datafile/rms_data_medium.332.742522617 ONLINE
Once this relocation is complete, the space is not released to source diskgroup (+DISK_GROUP03).It would be released once the source file gets deleted.
ASMCMD> pwd
+DISK_GROUP11/ORENQ1/DATAFILE
ASMCMD> ls -rlt
Type Redund Striped Time Sys Name
DATAFILE UNPROT COARSE FEB 07 22:00:00 Y MIG_DATA.1386.703225145
DATAFILE UNPROT COARSE FEB 07 23:00:00 Y DAILY_ITEM_FORE_I_PART.1366.704037409
DATAFILE UNPROT COARSE FEB 07 23:00:00 Y DAILY_ITEM_FORE_T_PART.1306.704037117
DATAFILE UNPROT COARSE FEB 07 23:00:00 Y DAILY_SALES_DISC_I_PART.1587.704035493
DATAFILE UNPROT COARSE FEB 07 23:00:00 Y ITEM_LOC_HIST_I_PART.1038.704040351
DATAFILE UNPROT COARSE FEB 07 23:00:00 Y MIG_INDEX.1398.703222837
DATAFILE UNPROT COARSE FEB 07 23:00:00 Y REIM_DATA_SMALL.1322.703178457
DATAFILE UNPROT COARSE FEB 07 23:00:00 Y REIM_INDEX_SMALL.1310.703178943
DATAFILE UNPROT COARSE FEB 07 23:00:00 Y REPL_RESULTS_I_PART.1042.704041773
DATAFILE UNPROT COARSE FEB 07 23:00:00 Y RESA_INDEX_SMALL.1290.703179451
DATAFILE UNPROT COARSE FEB 07 23:00:00 Y RMS_DATA_LARGE.1332.704044971
DATAFILE UNPROT COARSE FEB 07 23:00:00 Y RMS_DATA_LARGE.1585.721625715
DATAFILE UNPROT COARSE FEB 07 23:00:00 Y RMS_INDEX_LARGE.1045.704045503
DATAFILE UNPROT COARSE FEB 07 23:00:00 Y RMS_INDEX_LARGE.1396.704045725
DATAFILE UNPROT COARSE FEB 07 23:00:00 Y RMS_INDEX_SMALL.1350.703176469
DATAFILE UNPROT COARSE FEB 07 23:00:00 Y RPM_DATA_MEDIUM.1590.703179767
DATAFILE UNPROT COARSE FEB 07 23:00:00 Y RPM_DATA_SMALL.1037.703180593
DATAFILE UNPROT COARSE FEB 07 23:00:00 Y RPM_INDEX_SMALL.1392.703181677
N rms_data_large11.dbf => +DISK_GROUP11/ORENQ1/DATAFILE/RMS_DATA_LARGE.1585.721625715
DATAFILE UNPROT COARSE FEB 08 00:00:00 Y RMS_DATA_MEDIUM.1040.721644609
N rms_data_medium11.dbf => +DISK_GROUP11/ORENQ1/DATAFILE/RMS_DATA_MEDIUM.1040.721644609
ASMCMD> rm rms_data_medium11.dbf
ASMCMD> ls -rlt
Type Redund Striped Time Sys Name
DATAFILE UNPROT COARSE FEB 07 22:00:00 Y MIG_DATA.1386.703225145
DATAFILE UNPROT COARSE FEB 07 23:00:00 Y DAILY_ITEM_FORE_I_PART.1366.704037409
DATAFILE UNPROT COARSE FEB 07 23:00:00 Y DAILY_ITEM_FORE_T_PART.1306.704037117
DATAFILE UNPROT COARSE FEB 07 23:00:00 Y DAILY_SALES_DISC_I_PART.1587.704035493
DATAFILE UNPROT COARSE FEB 07 23:00:00 Y ITEM_LOC_HIST_I_PART.1038.704040351
DATAFILE UNPROT COARSE FEB 07 23:00:00 Y MIG_INDEX.1398.703222837
DATAFILE UNPROT COARSE FEB 07 23:00:00 Y REIM_DATA_SMALL.1322.703178457
DATAFILE UNPROT COARSE FEB 07 23:00:00 Y REIM_INDEX_SMALL.1310.703178943
DATAFILE UNPROT COARSE FEB 07 23:00:00 Y REPL_RESULTS_I_PART.1042.704041773
DATAFILE UNPROT COARSE FEB 07 23:00:00 Y RESA_INDEX_SMALL.1290.703179451
DATAFILE UNPROT COARSE FEB 07 23:00:00 Y RMS_DATA_LARGE.1332.704044971
DATAFILE UNPROT COARSE FEB 07 23:00:00 Y RMS_DATA_LARGE.1585.721625715
DATAFILE UNPROT COARSE FEB 07 23:00:00 Y RMS_INDEX_LARGE.1045.704045503
DATAFILE UNPROT COARSE FEB 07 23:00:00 Y RMS_INDEX_LARGE.1396.704045725
DATAFILE UNPROT COARSE FEB 07 23:00:00 Y RMS_INDEX_SMALL.1350.703176469
DATAFILE UNPROT COARSE FEB 07 23:00:00 Y RPM_DATA_MEDIUM.1590.703179767
DATAFILE UNPROT COARSE FEB 07 23:00:00 Y RPM_DATA_SMALL.1037.703180593
DATAFILE UNPROT COARSE FEB 07 23:00:00 Y RPM_INDEX_SMALL.1392.703181677
N rms_data_large11.dbf => +DISK_GROUP11/ORENQ1/DATAFILE/RMS_DATA_LARGE.1585.721625715
Cheers…!!!
Rishi
How to become an Oracle Certified Master
Being an OCM is really an accomplishment in a DBA’s career. This is something that gives you a recognition among pool of elite group of oracle professionals. This day came into my life few days back and i was more than happy when i got the confirmation mail from oracle saying that I am OCM now.
While preparing for my OCM exam, i had lot of doubts regarding the infrastructure provided during the exam, the version of Linux that would be available, availability of documentation, hands on trainings etc..etc…I used to read blogs from other OCMs (who had already gone through the practicum) to get as much information as i can for the exam. After all, it was matter of $$$$$ spent to book the exam as i myself was paying for my exam,it was not company paid.
All OCMs are required to sign a non-disclosure agreement during the exam, so they are not supposed to share any information about the exam.
Below are few tips for people preparing for this elite certification
1) Be an OCP
The OCM exam requires you to be already an OCP –10g/11g depending upon the exam (10g/11g) you are going to choose.So Be an OCP(10g/11g) first. You can check http://education.oracle.com/pls/web_prod-plq-dad/db_pages.getpage?page_id=151 to see details on how to be OCP.
2) Take 2 hands-on trainings from Oracle
After OCP, you are required to take 2 hands-on trainings from Oracle University. These trainings are pre-requisites and required to be taken before you send request for OCM kit to oracle. I had taken only one training from oracle before appearing for the exam. So was not sure if it is mandatory to take both the trainings before appearing for the exam.The answer to this is its not mandatory to take both the trainings before exam but immediately after the exam, you need to submit your hands-on courses to oracle. The result of OCM exam will not be declared unless and until the 2 hands-on course requirements are completed. So better to finish both trainings before exam, they will help you in preparation. In case you have not taken them before exam, take them immediately after the exam and submit for approval on http://www.pearsonvue.com/oracle/ on Submit Course Form link.The hands-on course requirements are available at http://education.oracle.com/pls/web_prod-plq-dad/db_pages.getpage?page_id=99
I took one of my trainings after the exam.You will get your result of OCM exam only once both the trainings are approved. You can check the hands-on courses that can be taken for Oracle 10/11g OCM at http://education.oracle.com/pls/web_prod-plq-dad/db_pages.getpage?page_id=244. As a personal recommendation, I’ll suggest to go for RAC and SQL Tuning.
3) OCM Exam registration
Before writing the exam, you need to register at OTC.(Oracle Testing Center) Probably you can check with the Oracle Testing Center in your city. In case there’s no OTC in your city, you need to travel to other location to take the exam. If you are required to travel to another city, my suggestion is to reach there one day prior to exam and don’t book your return flight for 2nd day. There are possibilities that you are required to stretch your day.
Also, there are chances that the exam date mentioned to you gets postponed, be in touch with the oracle representative about that. There are lot of chances that exam gets postponed/cancelled. It happened with me when i booked my exam in another city but I was lucky enough to get the 2nd date in my own city.
4) Exam Preparation
Cover everything mentioned at http://education.oracle.com/pls/web_prod-plq-dad/db_pages.getpage?page_id=41&p_exam_id=10gOCM or http://education.oracle.com/pls/web_prod-plq-dad/db_pages.getpage?page_id=41&p_org_id=&lang=&p_exam_id=11gOCM.
5) OCM Result
The result will be declared once you are done with submission of hands-on course requirements.I got it within 1 week after hands-on course requirements were approved.
6) Tech Details
RHEL 4 was available for Oracle 10g exam.Not sure why they mentioned KDE here http://education.oracle.com/pls/web_prod-plq-dad/db_pages.getpage?page_id=41&p_exam_id=10gOCM, but GNOME was available for me.
OEM is not available for everything.
6) My tips
3P’s to succeed in the exam..Practice, Practice and Practice…..Even if you are champ in doing things at work, practice each and everything mentioned in syllabus to do the things right at first attempt in less time.You will hardly get time to re-attempt things.
There’s no substitute for experience. If you don’t have real life experience as a DBA, its not your baby.Better have a real life experience for few years and then go for the exam.
Time is the biggest killer in exam. Even if you know things, try to set benchmark for most of your tasks.
I used to create a database with a manually written parameter file in 6 minutes before going for the exam.I can write whole listener.ora and tnsnames.ora manually without any documentation or sample files.
Why these things are required is because the scenarios given in exam are required to be completed very fast and if you think that you will see syntax from documentation, you will end up in loosing time.
Documentation is available without SEARCH function. MASTER index of documentation will be available.And its my personal experience that documentation was not of any use. Believe me you will have documents but not time to open and search these documents.
Drop me a mail @ mahajan.rishi@gmail.com for any queries.
SQL*NET Logging and tracing
Client server connection issues can be diagnosed by checking the log files at server and client level. Further tracing can be enabled to drill down the problems. All the client and server level logging/tracing parameters are defined in sqlnet.ora at server and client end.
Network Tracing
Tracing can be activated at different level depending upon the requirements.
| Tracing Level | Meaning | Comments |
| 0 | OFF | Tracing is off |
| 4 | USER | USER level tracing used to diagnose user level issues. |
| 6 | ADMIN | ADMIN level tracing used to diagnose installation issues. |
| 16 | SUPPORT | Used to collect Oracle Support specific information. |
Enable Logging at Server Level
To enable logging at the database server level, we need to set the following parameters
1) LOG_DIRECTORY_SERVER = <PATH for log directory> . Default is $ORACLE_HOME/network/log
3) LOG_FILE_SERVER = <Log file name>. Default is sqlnet.log
Enable Tracing at Server Level
To enable tracing at the database server level, we need to set the following parameters.
1) TRACE_DIRECTORY_SERVER = <PATH for trace directory> . Default is $ORACLE_HOME/network/trace
2) TRACE_FILE_SERVER = <PATH for trace directory> . Default is svr_<pid>.trc
3) TRACE_LEVEL_SERVER = {OFF|USER|ADMIN|SUPPORT}. Default is OFF.
Enable Logging at client Level
1) LOG_DIRECTORY_CLIENT = <PATH for log directory> . Default is current working directory from where the connection is made with the server
2) LOG_FILE_CLIENT = <Log file name>. Default is sqlnet.log
Enable tracing at client Level
1) TRACE_DIRECTORY_CLIENT = <PATH for log directory> . Default is current working directory from where the connection is made with the server
2) TRACE_FILE_CLIENT = <Log file name>. Default is cli_<pid>.trc
3) TRACE_LEVEL_CLIENT = {OFF|USER|ADMIN|SUPPORT}. Default is OFF.
Apart from these parameters, we can also use these additional parameters
TRACE_TIMESTAMP_SERVER=ON – To add timestamps in trace files of server level tracing
TRACE_TIMESTAMP_CLIENT=ON - To add timestamps in trace files of client level tracing
Note:- The listener has to be bounced using START and STOP commands after making any changes in sqlnet.ora file on database server. The RELOAD command doesn’t read the changed sqlnet.ora.
Listener tracing
Tracing parameters at listener level can be defined in listener.ora of database server.1) TRACE_DIRECTORY_LISTENER = <PATH for log directory> . Default is current working directory from where the connection is made with the server
2) TRACE_LEVEL_LISTENER = {OFF|USER|ADMIN|SUPPORT}. Default is OFF.
We can use SET and SHOW command on LSNRCTL utility to set the check the values of listener parameters.
Creating an Oracle Database manually
Most of the time, we need to create the database manually. Below are the steps to create a database manually in few minutes.
1) Create an init<SID>.ora file under $ORACLE_HOME/dbs with the following parameters.
audit_file_dest='/u01/app/oracle/admin/cust/adump'
background_dump_dest='/u01/app/oracle/admin/cust/bdump'
core_dump_dest='/u01/app/oracle/admin/cust/cdump'
control_files='/u01/app/oracle/oradata/cust/control01.ctl','/u01/app/oracle/oradata/cust/control02.ctl','/u01/app/oracle/oradata/cust/control03.ctl'
db_block_size=8192
db_name='cust'
job_queue_processes=10
processes=200
pga_aggregate_target=80M
sga_target=300M
sga_max_size=300M
remote_login_passwordfile='EXCLUSIVE'
sessions=150
undo_management='AUTO'
undo_tablespace='UNDOTBS01'
user_dump_dest='/u01/app/oracle/admin/cust/udump'
2) Create password file using ORAPWD utility.
Usage: orapwd file=<fname> password=<password> entries=<users> force=<y/n>
orapwd file=orapwcust password=xxxxxx entries=20 force=<y/n>
Note:- There are no spaces around the equal-to (=) character.
Force is used to overwrite and existing file.
3) Create directories
mkdir –p /u01/app/oracle/admin/cust/adump
mkdir –p /u01/app/oracle/admin/cust/bdump
mkdir –p /u01/app/oracle/admin/cust/cdump
mkdir –p /u01/app/oracle/admin/cust/ddump
mkdir –p /u01/app/oracle/oradata/cust
mkdir –p /u01/app/oracle/oradata/cust/arch
3) Create database manually
REUSE has been used with CONTROLFILE,DATAFILE and ONLINE REDOLOG files so that if the create database statement fails, there is no need to cleanup the files that got created. The files would be overwritten.
CREATE DATABASE rishi controlfile reuse
USER SYS IDENTIFIED BY rishi
USER SYSTEM IDENTIFIED BY rishi
LOGFILE GROUP 1 ('/u02/oradata/rishi/redoa/redo01a.log','/u02/oradata/rishi/redob/redo01b.log') SIZE 50M reuse,
GROUP 2 ('/u02/oradata/rishi/redoa/redo02a.log','/u02/oradata/rishi/redob/redo02b.log') SIZE 50M reuse,
GROUP 3 ('/u02/oradata/rishi/redoa/redo03a.log','/u02/oradata/rishi/redob/redo03b.log') SIZE 50M reuse
MAXLOGFILES 5
MAXLOGMEMBERS 5
MAXLOGHISTORY 1
MAXDATAFILES 400
MAXINSTANCES 1
CHARACTER SET US7ASCII
NATIONAL CHARACTER SET AL16UTF16
DATAFILE '/u02/oradata/rishi/system/system01.dbf' SIZE 325M REUSE EXTENT MANAGEMENT LOCAL
SYSAUX DATAFILE '/u02/oradata/rishi/system/sysaux01.dbf' SIZE 325M REUSE
DEFAULT TABLESPACE users datafile '/u02/oradata/rishi/data/users01.dbf' size 20M reuse
DEFAULT TEMPORARY TABLESPACE temp TEMPFILE '/u02/oradata/rishi/temp/temp01.dbf' SIZE 200M REUSE
UNDO TABLESPACE undotbs DATAFILE '/u02/oradata/rishi/undo/undotbs01.dbf' SIZE 200M REUSE AUTOEXTEND ON MAXSIZE UNLIMITED;
4) Post-db creations scripts
Connect as SYS
SQL> @?/rdbms/admin/catalog.sql
SQL> @? /rdbms/admin/catproc.sql
SQL> @? /rdbms/admin/catblock.sql;
SQL> @?/sqlplus/admin/plustrce.sql
SQL> Connect SYSTEM/XXX
SQL> @?/sqlplus/admin/pupbld.sql
5) Create SPFILE from PFILE
SQL> Create spfile from pfile;
SQL> startup force
5) Enable Archivelog
SQL> Alter system set log_archive_dest_1=’location=/u01/app/oracle/oradata/cust/arch’ scope=spfile;
SQL> Alter system set log_archive_format=’cust_%s_%t_%r.arc’ scope=spfile;
SQL> startup mount
SQL> alter database archivelog;
SQL> alter database open;
SQL> alter system switch logfile; – To test archiving
DBCA - Stuck on Clone database creation step
Checked /u01/app/oracle/product/10.2.0/db_1/cfgtoollogs/dbca directory. There's a trace.log file with the following lines.
[Thread-10] [20:16:35:207] [OsUtilsBase.deleteFile:742] OsUtilsBase.deleteFile: /u01/app/oracle/product/10.2.0/db_1/cfgtoollogs/dbca/test/inittestTemp.ora
[Thread-10] [20:16:44:550] [BasicStep.execute:201] Executing Step : CLONE_POST_CREATE_SCRIPTS
[Thread-10] [20:16:44:551] [StepErrorHandler.setIgnorableErrors:250] setting Ignorable Error: ORA-00942
[Thread-10] [20:16:44:551] [StepErrorHandler.setIgnorableErrors:250] setting Ignorable Error: ORA-06512
[Thread-10] [20:16:44:552] [StepErrorHandler.setIgnorableErrors:250] setting Ignorable Error: ORA-20000
[Thread-10] [20:16:44:552] [StepErrorHandler.setIgnorableErrors:250] setting Ignorable Error: ORA-01952
[Thread-10] [20:16:44:552] [StepErrorHandler.setIgnorableErrors:250] setting Ignorable Error: ORA-01927
I didn't get any clue from the error. Checked metalink note 188134.1 and trace dbca. Got the following in trace output.
[oracle@dguard1 ~]$ cat dbca.out
[main] [20:4:5:579] [NetworkUtils.getOneLocalListenerProtocolAddress:2637] bestSoFar=(ADDRESS=(PROTOCOL=IPC)(KEY=EXTPROC1))
[main] [20:4:5:580] [NetworkUtils.getOneLocalListenerProtocolAddress:2650] host=null hostParam=dguard1
[main] [20:4:5:581] [NetworkUtils.getOneLocalListenerProtocolAddress:2712] returning bestAddrSoFar=(ADDRESS=(PROTOCOL=TCP)(HOST=dguard1)(PORT=1521))
[main] [20:4:5:581] [NetworkUtils.getOneLocalListenerProtocolAddress:2772] Returning bestSoFar=(ADDRESS=(PROTOCOL=TCP)(HOST=dguard1)(PORT=1521))
[main] [20:4:5:582] [NetworkUtils.getOneLocalListenerProtocolAddress:2772] Returning bestSoFar=(ADDRESS=(PROTOCOL=TCP)(HOST=dguard1)(PORT=1521))
[main] [20:4:5:586] [NetworkUtils.getLocalListenerAddresses:915] listener[0]=LISTENER address=null
[main] [20:4:5:586] [StepContext.setListenersToUpdate:681] needLocalListener = false
Found that a listener was available on server (although down) and i forgot to remove it during cleanup of old database on server.I removed the old listener using netca and dbca went fine after that.
Thanks
oracle.sysman.emcp.agent.AgentPlugIn failure during oracle enterprise manager installation on windows
Configuration assistant "OMS Configuration Assistant" failed
SEVERE:OUI-10104:Some of the configuration assistants failed. It is strongly recommended that you retry the configuration assistants at this time. Not successfully running any "Recommended" assistants means your system will not be correctly configured. Select the failed assistants and click the 'Retry' button to retry them.
The "/oracle/products/agent10g/cfgtoollogs/configToolFailedCommands" script contains all commands that failed, were skipped or were cancelled. This file may be used to run these configuration assistants outside of OUI. Note that you may have to update this script with passwords (if any) before executing the same.
The "/oracle/products/agent10g/cfgtoollogs/configToolAllCommands" script contains all commands to be executed by the configuration assistants. This file may be used to run the configuration assistants outside of OUI. Note that you may have to update this script with passwords (if any) before executing the same.
configToolFailedCommands contain the following failed command.
oracle.sysman.emcp.agent.AgentPlugIn
I did a cleanup and re-installation 2 times but same issues.
Checked lot of threads on oracle/google, but was not able to find solution. Finally, checked my OMS configuration files (emd.properties etc) While checking log files closely, found that all these files contains repository URL with hostname set to LOCALHOST. This is where the problem was.The hostname is not being picked up during the installation
Did a cleanup again and set ORACLE_HOSTNAME variable under MY COMPUTER- ENVIRONMENT VARIABLES.
ORACLE_HOSTNAME with value
After deinstallation of grid software, we need to remove services too (in services.msc) The desinstallation doesn't remove them.
Following command can be used to remove services
c:\> sc delete service_name
Service_name can be seen using services.msc.
Once services have been deleted and ORACLE_HOSTNAME is set, tried the installation again and it went fine this time.
Cheers!!!!
Bandwidth calculations for Datguard
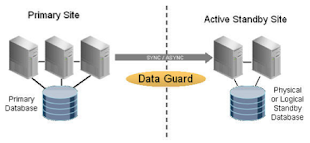
In dataguard, the primary database sends the redo generated on primary to the standby database to keep the standby in sync with the primary. The bandwidth required to transfer the redo from primary to standby depends on the amount of redo generated by primary database. The more the redo generated on primary, more will be the bandwidth required to transfer it to standby. If the bandwidth between the primary and standby is not sufficient to transfer the redo generated, the standby will lag behind primary and soon they will go out of sync. So, the bandwidth between the primary and standby should be sufficient enough to transfer the redo from primary to standby. The procedure below shows how to calculate bandwidth before creating a dataguard setup.
1) Measure the Peak Redo Rate
How does one measure the peak redo generation rate for a database?
Use the Oracle Statspack utility for an accurate measurement of the redo rate.
During the peak duration of your business, run a Statspack snapshot at periodic intervals. For example, you may run it three times during your peak hours, each time for a five-minute duration. The Statspack snapshot report will include a "Redo size" line under the "Load Profile" section near the beginning of the report. This line includes the "Per Second" and "Per Transaction" measurements for the redo size in bytes during the snapshot interval. Make a note of the "Per Second" value. Take the highest "Redo size" "Per Second" value of these three snapshots, and that is your peak redo generation rate. For example, this highest "Per Second" value may be 394,253 bytes.
While calculating the peak redo rate, consider the maximum activity days if they occur frequently in you business. For example, for a gift store, the peak days would be 2/3 days before new year.
Note that if your primary database is a RAC database, you must run the Statspack snapshot on every RAC instance. Then, for each Statspack snapshot, sum the "Redo Size Per Second" value of each instance, to obtain the net peak redo generation rate for the primary database. Remember that for a RAC primary database, each node generates its own redo and independently sends that redo to the standby database - hence the reason to sum up the redo rates for each RAC node, to obtain the net peak redo rate for the database.
2) Redo Generation Rate and the Required Network Bandwidth
The formula used for calculating newtwork (assuming a conservative TCP/IP network overhead of 30%) is:
Required bandwidth = ((Redo rate bytes per sec. / 0.7) * 8) / 1,000,000 = bandwidth in Mbps
Thus, our example of 385 KB/sec peak rate would require an available network bandwidth of at least
((394253 / 0.7) * 8) / 1,000,000 = 4.5 Mbps.
For this Data Guard configuration, a standard T1 line primary-standby connection providing up to 1.544 Mbps will not be adequate. However, a T3 connection (typically providing up to 44.736 Mbps) may be more than adequate, provided of course this connection is not heavily shared by other applications that may reduce the effective bandwidth for the primary-standby connection. This means that while the peak redo generation rate is a good indication of your Data Guard-related network requirements, make sure that while specifying your network requirements with your network service provider, you also consider other applications and their Service Level Agreements (SLAs) that may be sharing this network. Remember - the formula above indicates the network bandwidth that should be available to Data Guard, it does not indicate what the entire network bandwidth should be between your primary and DR data centers.
If this network link may be shared with other critical apps, consider configuring a higher bandwidth network e.g. dark fibre, OC1, or OC3, and/or using Quality of Service (QoS) to prioritize network traffic or to allocate dedicated bandwidth to a particular class of traffic, to prevent bursty traffic adversely affecting your latency-sensitive traffic (such as Data Guard redo traffic).
If this network link may be shared with other critical apps, consider configuring a higher bandwidth network e.g. dark fibre, OC1, or OC3, and/or using Quality of Service (QoS) to prioritize network traffic or to allocate dedicated bandwidth to a particular class of traffic, to prevent bursty traffic adversely affecting your latency-sensitive traffic (such as Data Guard redo traffic).
Thanks
Rishi
Changing VIP in RAC
1) Check the current VIPs using the srvctl command:
This will display the VIP information for the first server.
[root@rac1 bin]# ./srvctl config nodeapps -n rac1 -a -g -s -l
VIP exists.: /rac1-vip/192.168.10.73/255.255.255.0/eth0
GSD exists.
ONS daemon exists.
Listener exists.
Run the command for the other server as well to check the information.
[root@rac2 bin]# ./srvctl config nodeapps -n rac1 -a -g -s -l
VIP exists.: /rac1-vip/192.168.10.74/255.255.255.0/eth0
GSD exists.
ONS daemon exists.
Listener exists.
2) Change VIP in /etc/hosts
3) Change the VIP in OCR.
You can run both commands on one server, but make sure you run both commands:
srvctl modify nodeapps -n
$new_VIP_ip_address is the new VIP that you wish to change to, of the form 10.40.20.121 or 10.231.20.121 etc
$ethernet_interface is the interface of the oracle "public"
interface that you modified in step above, of the form "bond0" or "eth0".
[root@rac1 bin]# srvctl modify nodeapps -n rac1 -A 192.168.10.78/255.255.255.0/eth0
[root@rac2 bin]# srvctl modify nodeapps -n rac1 -A 192.168.10.79/255.255.255.0/eth0
4) Verify the changed VIP’s using
[root@rac1 bin]# ./srvctl config nodeapps -n rac1 -a -g -s -l
[root@rac2 bin]# ./srvctl config nodeapps -n rac2 -a -g -s -l
Please Note:
Do not attempt to add ":0" or some other notation at the end of $ethernet_interface to indicate an alias - Oracle will add that by itself.
If it is not a production server, reboot completely at this point to ensure that the VIP is properly configured and restarts correctly on startup.